Letterpressing without Printing Plates
I've been lazy getting the letterpress supplies out lately although I very much enjoy the process and beautiful texture it gives. When I received my box of Studio Calico goodies this month, however, I found a piece of laser cut faux leather in the embellishment kit "Iris" and just had to give printing with it a try.
Yes, you hear me right! You can totally do letter pressing without the regular plastic printing plates. You just need to experiment a little with additional shims and thickness of the letterpress/cotton paper.
What you need is a manual die-cutting machine, the letterpress bundle, letterpress ink, a way to temporarily adhere the faux printing plate to the letterpress platform and, well, your printing plate alternative (supplies are linked below).
If you're not sure your printing plate alternative will work, you can try blind impressing first, i.e. you run the process without ink. That way you'll see if things need tweaking without getting unneccesarily messy.
The faux leather piece I used has two different sides. One is very soft and sued-y and I put the temporary adhesive on this side (I could rub it all off afterwards) and put it directly down on the printing platform, then inked the textured leathery side with teal blue letterpress ink.
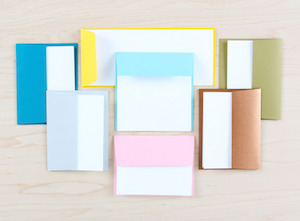
Here's what it looked like straight out of the Cuttlebug on the first try with ink. So pretty - imagine this done with gold ink...! The card I made with the print came together super quick especially with the new Card Bases add-on with its pre-cut and fold card bases and matching colored envelopes. I found a diamond design similar to the print in a kraft die-cuts pack (also in the embellishments kit) and the gold foil sentiment from the card kit kind of was a perfect match to top it all off.
I hope you enjoyed this mini tutorial today and have a lovely Sunday!
Supplies: